Wednesday, May 30, 2012

Yarn Spun Inspired Decor

Images originally @ On To Baby and Green Wedding Shoes 

What an amazing idea for overall decor for your wedding! I love that this could be easily handmade and still look fresh, well put together, and unique! I can see brides who have a passion for knitting or sowing easily making this the theme for their wedding without going over the top or any bride at that! I just love it overall. What a beautiful way to effortlessly add a major decoration design to your wedding! By the way you can easily find those white block letters, yarn and embroidary hoops at Michael's or Joann's for a couple of dollars each, Enjoy!

Monday, May 21, 2012

DIY Photobooth Props

You can buy 12 DIY photobooth props online at places like Etsy for around $8 + S/H.....
OR you can make your own!!!!
It's pretty simple! You can find everything you need at Michael's.
Materials:
-Sturdy Felt Paper or Cardstock paper (there is 2 kinds of felt, make sure you get the sturdier one) Price: cents for the felt paper and cardstock
-Wooden sticks or skewers (you can find the wooden sticks on the aisle where they have the materials for masquerade masks)
Price: a couple of dollars
-hot glue sticks and a glue gun (or super glue)
Price: around $5 for both, but this is something I hope you already have :)
 -If you just think you can't draw AT ALL, you can use a pencil to trace the shapes on the felt before you cut, then erase it (I even used the eraser itself to draw with, it was easier to just brush it away after I cut the shape)
-The best way to make sure both sides of the mustaches, lips, glasses, etc will be equal in size is to only draw 1/2 of the shape, then fold the paper, then cut!
- Carefully position the figures onto the sticks the way you want them to be held. Glue your cut figures to the wooden sticks and you are done!!!
Everybody LOVES props!!! There are endless shapes you can make and even more ways you can decorate your wooden stick (fabric, paint, etc!) Enjoy!

Thursday, May 10, 2012

Follow me with Bloglovin'


The Cucumber Bride Blog at Bloglovin.com


For all of you "blog lovin''" users! You can now find and follow me at Bloglovin' as well as your other favorite wedding and everyday blogs! Enjoy!

Tuesday, May 8, 2012

Polaroid Photobooth Prop

DIY Polaroid Photobooth Prop 
How adorable and simple to make is this! I can imagine we can just go to any Staples or Michael's and buy  a cheap poster board, cut a square carefully with scissors or an Exacto knife and print out the lettering and glue them!

Saturday, May 5, 2012

DIY Clutch Bag

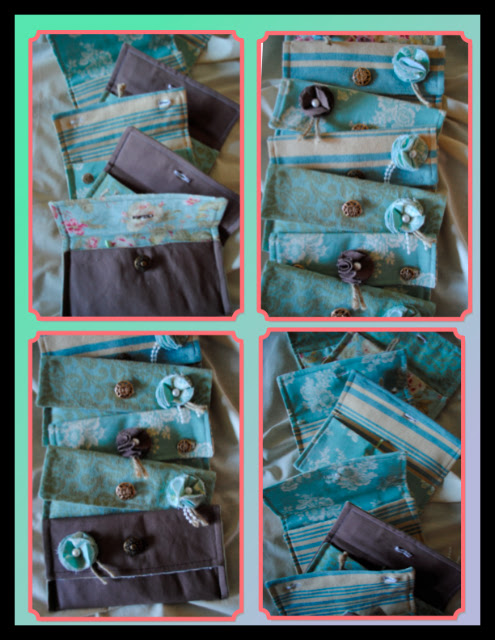
I made these especially for my bridesmaids, Maid of Honor, Matron of Honor and flowergirl. You may need some experience or familiarity with sewing and a sewing machine. I had no experience besides one semester in middle school and random craft projects as a girl with my mom's sewing machine, but was still able to make these clutches that I was so incredibly proud of! Good luck!

The easiest step by step instruction video I found is the one above. Besides her tips, I found that the clutch is sturdier if you also use sturdier material. Other than that, this video is great! I found everything I needed at Jo-ann's!

DIY ClutchDIY clutches for bridesmaids gifts

I loved these so much! Hope your bridal party loves them as much as mine did! Enjoy!


Doilie Canvas Tote Bags

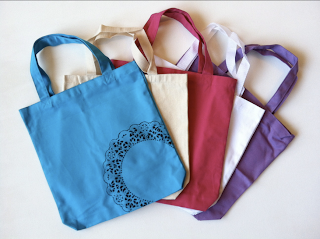
Wondering what to get your bridesmaids as thank you gifts? Or maybe you want to create a welcome package to out-of-state family members! I created the cutest totebags for my girls (and one for me of course!!!) to show them my appreciation for all their hard work!
Doilie Totebags
You can buy one of these at $20 each OR you can make your own for about $2 each! You decide! Here is how I did it and my DIY instructions to you:
Doilie Tote Bag DIY
 1. Buy some blank totes! I found the cheapest totes at www.cheaptotes.com. Only 99cents a bag for the "natural color cotton canvas" tote bags. 
2. Buy some fabric paint.  I used black and wish I would have used this fabric paint Spray seen here at Michael's (I dont remember the price, but it can't be more than $7-12) Instead I used a pump and....it did the job, but was much harder to manage the splatter effect on the tote. Spray NOT pump. Read instructions before using.

3. Buy Doilies. (you can use 1 doilie sheet to spray 2 totes, after that I found the doilie sheet got too soggy and would start to bleed through)

4. You also need:
- pins to pin down the doilie and monogram in place. 
- A monogram, I just printed letters out at a 200 point size on sturdy cardstock paper and cut out a stencil from them.
- Some cardboard or anything thick enough to prevent the paint to bleed from the front to the back of the tote.
5. WASH and DRY your totes before spraying. Place your thick cardboard or magazine INSIDE the tote so that the paint wont bleed through to the other side. Position and pin your doilie to your liking. Cover any area of the Totebag you do not want sprayed(like the handles for example) SPRAY your doilie. Continue until you have sprayed the doilie design onto all totes (this will give them time to dry before you spray the monogram). Once you're back to the first tote you sprayed, place thick carboard INSIDE the tote, position and pin your monogram. Cover all parts of the bag you do not want sprayed (this time the doilie image and the handles) and SPRAY. And you are DONE!

DIY Dolie Totes 
***important: when pinning, make sure the pin is not touching the tote. It should always rest completely on the stencil paper or doilie paper. Otherwise the figure of the pin could be spray painted onto your tote.

Enjoy!


Thursday, May 3, 2012

What to write on your Ceremony Programs

Really quick, I just wanted to pass along this info! Some of the first questions my brides have asked me when I first meet them is "What info goes on my ceremony program?" Below is the information I decided I wanted on my ceremony program:

What to write in my Ceremony Program
1. The cover page is simple. I included our names, date, location of the wedding and a monogram for decoration. But you can add as much as you want ( ie. name of the ceremony and reception venue)
2. I had limited space, but still managed to fit in my huge wedding party! If you have more space you can include your parents name (especially if they are paying for the wedding) flower girl, ring bearer etc!
3. Then to the Order of the Ceremony. This is really just bullet points of what goes on in the ceremony. Figure this out with your officiant or pastor. They should know exactly how the ceremony will proceed. Get the information and simply write it down in order. I also decided to write down the music being played during the Processional and Recessional (when you walk up and down the aisle). This part can differ from bride to bride a million ways! It's up to what you and your groom want.

Now, I had a non-religious wedding, so my program was fairly short and simple. But for brides with religious weddings, I believe talking it over with your pastor/clergy member is a MUST, there is so much more information needed in the program (hymns, readings, ritual descriptions). The ceremony program will be much more important because there will be guests completely unfamiliar to that type of ceremony and thus serve as a very informative tool as to what the rituals represent.

And for those of you organizing your own Ceremony Order (like me!) because you might be having a friend marry you (like me!) Here are a few helpful links for you to get started!
1. Legally Ordain your Friend You will find other helpful info about what to include in your ceremony order from the Universal Life Church, like including the "Declaration of Intent," which you MUST have for the ceremony to be legal.
2. A starting point for you on the individual events in the Ceremony Order
3. Examples on Vows and Ring vows from Martha Stewart

Hope this helps!

Tuesday, May 1, 2012

Luggage Tag Ceremony Programs

Hello! For this week, I will be sharing the inspiration to my own DIY wedding decor and of course the finished product! 

Martha Stewart Ceremony Program Luggage Tags

First one up, my ceremony programs. The instructions on how to make these as well as 24 other ideas on ceremony programs are on the link above. But all you need is:
-Cardstock paper of your choice (Michael's seems to be the easiest and cheapest place to find it)
- You can fit 6 tags per sheet (when it's 8 1/2 by 11). I made them on Word at 3 inches wide each.
-You may have some trial an error when trimming the top, so practice on one set before you print all of them. I used a corner punch from Martha Stewart instead of cutting the edges myself.
-hole punch at the top (leave space for that when making your templates on Word) And tie with your choice of ribbon, tulle, twine etc! Mine was 3 sheets in total (I printed front and back).

Here are Mine!
Luggage Tag Ceremony Programs

Ceremony Programs and Rice Toss Set- Up
I also made the bags for the Rice Toss out of coffee filters
 (but that is one project i do not recommend!)
Luggage Tag Ceremony Program and Rice Toss Bag